Entra ID Attack & Defense: Investigating Service Principal Misuse with EntraGoat
- Jv Cyberguard

- Dec 4, 2025
- 11 min read
In the first article, we spent time setting up the foundation: getting Entra ID audit logs and sign-in logs flowing into Splunk through a dedicated ingestion pipeline. If you haven’t gone through that setup yet, I recommend starting there as everything we do in this post depends on having those logs available and searchable.
ENTRA GOAT
In this article we will be working through setting up ENTRAGOAT, an intentionally vulnerable Microsoft Entra ID lab created by Semperis. If you’ve never heard of it, think of it as a hands-on way to explore the identity attack paths defenders struggle with every day.
ENTRA GOAT deploys a set of misconfigurations, weak privileges, and dangerous relationships inside your Dev E5 Entra ID tenant(which you can sign up for here)
Each scenario is built to mimic a real-world identity flaw. Things like overly permissive app registrations, risky group ownership, mismanaged service principals, or exposed Graph API permissions. The goal isn’t just to “capture the flag,” but to understand how attackers chain these configurations together to escalate from low privilege to high privilege inside Entra ID.

Over the next few posts, I’ll be walking through these scenarios, documenting what I learn, and sharing the detection opportunities I uncover along the way. If you’re interested in identity security, Entra ID privilege relationships, or understanding how attackers exploit cloud identity systems, this series will give you practical insight you can take back to your own environment. Let's start by answering two important questions.
Where do you set this up?
I decided to set it up on one of the PC's in my victim network in my home lab, alternatively you can just use your machine.
What can you expect to take away from the walkthrough here?
You will be able to determine if ENTRA GOAT is for you, and if so, how to get it working. Also, for this lab, I will be spending less time documenting the Attack in this post (Semperis explain the attacks beautifully on their website) as from a blue team perspective I'm more interested in sharing what we can get out from this from a threat hunting and detection development perspective. Our focus will be how it shows up in our logs and what might we be able to do with that information.
Let's Begin
To begin, follow the setup instructions found in the official repository to get ENTRAGOAT setup.
This was my first time using node, so it took a bit of tweaking to get all the pieces together to get my lab to load successfully. If you encounter issues following the setup instructions at the link above, please see my troubleshooting steps below as of Nov 23, 2025.
Troubleshooting steps to get ENTRA GOAT running
Now in actuality, it took me a good amount of time to get all of the packages working. I didn’t just clone the repo, run "npm start", and magically get a UI. On Windows, I ran into a bunch of small but compounding issues that broke the flow.
First, Node and npm themselves weren’t wired up properly. They were installed, but not on my PATH, so PowerShell couldn’t see the "node" or "npm" commands. On top of that, I was running npm commands from the root EntraGoat folder instead of the EntraGoat\frontend directory where the actual React app lives. So even when npm did run, it had nothing useful to work with – no package.json, no scripts, no React tooling.
Then I added NVM (Node Version Manager) to control Node versions, which is great in theory, but only if you install and configure it for the same user you’re actually using. In my case, NVM ended up under the administrator profile while I was running PowerShell as a different user, so the "nvm" command wasn’t recognized at all. The fix there was to make sure the correct NVM directory was on the system PATH and to run "nvm use 18.17.1" so that "node" and "npm" pointed to a clean, known-good Node 18 environment.
Once that was stable and I could run "node --version" and "npm --version" without issues, I went into EntraGoat\frontend and ran "npm install" to pull down the project dependencies. That’s when the real root cause showed up: the app’s start script relies on "react-scripts", and that package simply wasn’t installed. Every time I ran "npm start", Windows threw an error saying "react-scripts" was not recognized as a command.

The final fix was straightforward. I installed the missing tool directly with:
npm install react-scripts@5.0.1 --save-dev
That pulled in react-scripts, dropped the binaries into node_modules, and from there "npm start" finally launched the dev server and brought up the EntraGoat UI in the browser.
So if you’re stepping through this lab and run into the same issues, the practical checklist is this: make sure Node and npm actually work in PowerShell, run everything from the EntraGoat\frontend directory, use a stable Node version (I used 18.17.1 via NVM), run "npm install", and if "react-scripts" is missing, install it explicitly. That’s the path that actually got this running on my Windows box.
A good install and indicator that you have installed ENTRA GOAT properly would be output like this having followed the setup steps in the Github without issue or performed necessary tweaks in this section above.

Once you have the web interface up and running we can quickly tour the platform.
This is the homepage of ENTRA GOAT by navigating to localhost:3000
As it mentions, the goal here is to: Master Microsoft Entra ID Security Through Realistic Attack Scenarios. Test your skills, escalate privileges, and discover the hidden vulnerabilities in Azure Active Directory configurations.

We have 6 scenarios that we can work through, all of which are of different difficulty. Semperis, the creators of this CTF/learning platform also have walkthroughs on their site for each of these scenarios.
Red teamers may prefer to test their skills in breaching Entra or like me, you can see it as an opportunity to learn attack paths in Entra ID, see what logs get generated, and find ways to detect against them.
Each Scenario includes a:
Setup script
Clean Up script
Solution Walkthrough
Capture the flag
To maximize our learning experience, you would see in part 1 that I ensured the telemetry generated is logged by my Splunk Instance. If you don't have a SIEM, I suggest checking my blog for a 7 part series on how to build a home lab. It has over 15,000 views and has successfully helped many to build out a home lab and get creative.
Scenario 1: Misowned and Dangerous - Owner's Manual to Global Admin
Clicking on Scenario 1, there is the description of the scenario. Our starting point is that after a successful phishing attempt we have the creds for a user in our tenant. The user is in finance, so we have to escalate privileges and sign in as the Global Administrator (GA) to retrieve the flag. It also gives us the starting credentials for the compromised user.


Navigate to the EntraGoat Scenarios Folder and then run the EntraGoat-Scenario1-Setup PowerShell script. By default, one of the commands in the script may fail to complete. To fix this, I added the Direct.AccessAsUser.All permission to the required scope listed in the script. This permission scope is needed for the Azure admin account to perform directory-level actions (like adding or removing users) as itself. Without it, the authentication token granted to Microsoft Graph only allowed operations defined by the originally listed scopes, which limits what the script can do even if the account is a Global Administrator.

Once it is setup, you can log in using the creds it gives you.

Also looking at Splunk, You should see the results of the script running.

Enumeration:
Doing some quick enumeration on David, we checked the following:
His group memberships using Get-MgUserMemberOf
His roles using Get-MgRoleManagementDirectoryRoleAssignment
Service Principals that he owns- we see he is a Service Principal (SP) Owner for Finance Analytics Dashboard.

We check if the owned SP has any assigned permissions we found none.
We check for the SP having any directory role assignments and it does Privileged Authentication Administrator.

Privileged Authentication Administrator is a highly sensitive role. Referencing the Microsoft RBAC docs we see its capabilities.

Therefore, this presents an opportunity for lateral movement and potentially privilege escalation. Pivoting into the context of the service principal let's see how we can leverage the Service Principal and it's role to escalate privileges.
Pivoting into the Service Principal's context
Since David Hernandez is the owner of the Finance Analytics Dashboard Service Principal, we can add a client/secret to it to then authenticate as the Service Principal.
Save the secret details to the $clientSecret variable and the tenantID to the $tenantId variable.

We now disconnect and connect as the SP using APP-only context instead of delegated access as user. What does this mean?
When we authenticating earlier with
Connect-MgGraphwe were signing in as David Hernandez, a human identity. This produced a delegated session, where the access token represents a user and all Graph operations are executed on behalf of that user. Any permissions granted are constrained by David’s directory roles, conditional access policies, MFA requirements, and PIM activation state. In other words, the user identity remains the effective security boundary.
App-only authentication works very differently. In the screenshot below when we get-MgContext we see the AuthType is AppOnly.

When we authenticate using a Service Principal’s client ID, client secret, and tenant ID, we bypass any user context entirely and obtain an application token.
This creates a non-human identity session where Graph evaluates only the app’s permissions and directory roles not David’s. App-only access tokens do not enforce:
Conditional Access
MFA
PIM eligibility
Interactive sign-in requirements
User-based restrictions
Because of this, app-only tokens operate with a broader and more persistent trust boundary. Any script or workload with access to the app secret can sign in as the Service Principal and execute Graph calls with whatever privileges the SP has been granted.
In our scenario, the Finance Analytics Dashboard Service Principal has the Privileged Authentication Administrator role assigned. So once we established an app-only session, we are no longer acting as “David”; we are operating as the Service Principal itself, inheriting that role and its high-impact abilities, such as:
resetting user passwords (including Global Admin)
clearing or updating MFA methods
managing authentication methods and TAP registrations
performing high-risk identity operations without user-based restrictions
Delegated = “What the user can do?” App-only = “What can the Service Principal can do?”
This distinction is fundamental in identity security and explains why attackers aggressively target app secrets, certificates, and misconfigured enterprise applications: compromising an app-only credential often yields durable, high-privilege access that bypasses user-level controls entirely.
Privileged Account Takeover
So since we have authenticated as the Service Principal let us now demonstrate account takeover since Finance Analytics Dashboard has the Privilege Authentication Administrator role which we will be able to leverage.
We will begin by identifying the Global Admin account details and resetting the password of the Global Admin account.

Next let's assigning a Temporary Access Password to his account to avoid MFA. It didn't work because TAP wasn't enabled as an authentication method.
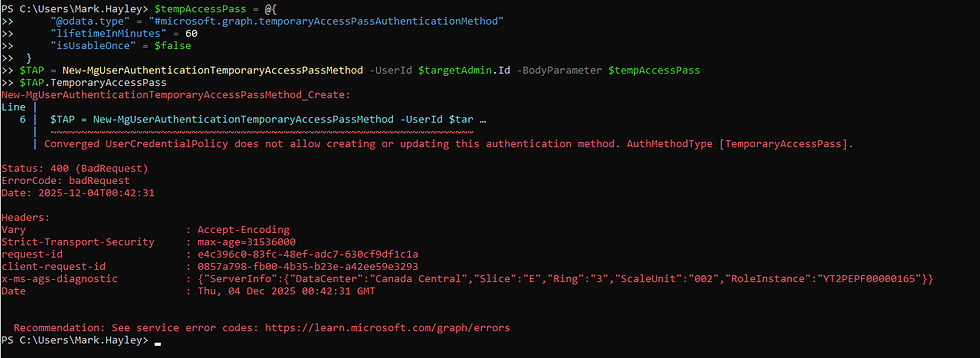
We fixed that, so let's try again.

It now works.

Temporary Access Pass (TAP) is a short-lived code that lets you authenticate without needing the user’s existing MFA. From an attacker’s perspective, creating a TAP for the Global Admin gives you a clean, MFA-free path straight into the Azure portal. Once you have that TAP, you can sign in as the GA and fully take over the tenant.
Opening an Incognito window and trying to logon now.

We're in!

Let's capture the flag!

Submit it.

Logs Don't Lie
We now return to the defensive side. Let's now see how this attack manifests itself in the Splunk Entra Audit and Signin Logs.

I like the search below as it quickly gives us a high level overview of events that took place during the attack.

Detecting the adding of credentials to the David's Service principal
So the first query we build is based on the events mapped to Step 1 of the attack - adding Secrets to a Service Principal. I extracted the most important fields that in a real investigation would allow us then to make pivots. Below for example, let's say we were notified of David being phished. The below query tell us if efforts were made to add secrets to any Service Principals as well as all pertinent information is listed in the table.

It's worth noting that this activity can also serve as a good base for a detection, you would have to find some way to make it unique to your environment though since Adding new credentials to a service principal can also be admin activity. For example,
Trying to find this activity on Service Principals that have not authenticated for sometime.
Secrets added by atypical users or automation accounts.
Credential additions outside normal rotation windows. Is the policy every 90 days? Well referencing the last update how much time has elapsed? May be worth investigating.
In terms of MITRA ATT&CK mapping this would fall under:
T1098 – Account Manipulation Sub-technique: T1098.003 – Additional Cloud Credentials
Adding a new client secret or certificate to an Azure AD / Entra ID Service Principal directly fits the definition. Reference: https://attack.mitre.org/techniques/T1098/003/
See the SPL below:
index=entra_audit activityDisplayName IN (Add service principal credentials)
| eval UserAgent = mvindex('additionalDetails{}.value',0)
| rename activityDisplayName as Operation,
         initiatedBy.user.userPrincipalName as Actor_UPN,
         initiatedBy.user.ipAddress as CallerIpAddress,
         targetResources{}.displayName as TargetObject,
         targetResources{}.type as TargetType,
         targetResources{}.id as TargetID,
         targetResources{}.modifiedProperties{}.newValue as TargetProperties.NewValues
| table _time correlationId Actor_UPN Operation CallerIpAddress UserAgent TargetObject TargetType TargetID result TargetProperties.NewValues
Detecting lateral movement to the Service Principal context.
I noticed that I am only receiving interactive sign-in logs and as a result was unable to find my pivot to the Service Principal context in Splunk. Going back to the Splunk Addon for Microsoft Azure documentation it mentioned that ingesting non-interactive sign-in logs would require a subscription, but I'm not going to configure that at this point. I may circle back and work on this in an update to the article.

However, let's do a quick export since we can see the sign-in to the Service Principal in the portal.

I will now ask Chatgpt to Beautify the json export for a better view.

Ideally, what you would want to do is pivot in our SIEM across non-interactive sign-ins for the Service Principal ID that the client secret was added to. Because a Service Principal is an application identity—not a human account—Entra automatically classifies all of its authentications as non-interactive.
Leveraging these logs would enable us to create higher fidelity detections by chaining the adding secrets activity to a follow on sign in within temporal proximity of the first event.
From an investigation perspective, one query I would like to use here is to run a stats count by to identify all sign-in activity from the identified malicious IP address. This would help us to scope and identify lateral movement. A query for this could look like:

The output from this search will help drive our investigation forward. Are there other accounts whose audit activities we would now have to investigate? We may need to check the activity logs for activities performed by the accounts during the incident window. It also allows us to perform some containment and eradication activities in the process.
index=entra_signin ipAddress=<REDACTED>
| stats count earliest(_time) as earliest latest(_time) as latest by userDisplayName appDisplayName src_ip status.additionalDetails action location.city location.state status.failureReason
| eval earliest = strftime(earliest,"%m-%d-%Y %H:%M:%S")
| eval latest   = strftime(latest,"%m-%d-%Y %H:%M:%S")
| sort + earliest
Detecting Privilege Escalation attempts to the Global Admin account
During the attack, using the highly privileged service principal we reset the Global Admin Password and then assigned it a temporary access passcode (TAP) to bypass MFA. Well, hopefully a threat actor would know better than to be this noisy, but a Service Principal performing password reset activity is a red flag. A realistic detection template we can derive from this scenario would be the one in the screenshot below. It's a search for a password reset activity where the ServicePrincipalId field is not null.

index=entra_audit activityDisplayName="Reset user password"
initiatedBy.app.servicePrincipalId = *
| eval UserAgent = mvindex('additionalDetails{}.value',0)
| eval Actor = coalesce('initiatedBy.app.displayName', 'initiatedBy.user.userPrincipalName',"null")
| rename activityDisplayName as Operation,
         initiatedBy.app.servicePrincipalId as SPN_Id,
         initiatedBy.user.ipAddress as CallerIpAddress,
         targetResources{}.userPrincipalName as Target,
         targetResources{}.type as TargetType,
         targetResources{}.id as TargetId
| table _time correlationId Actor SPN_Id Operation CallerIpAddress UserAgent Target TargetType TargetId
During the course of this Entra ID investigation we also learned that it would also be important to investigate and perhaps check for "User registered security info" events, since this could be used for persistence allowing the attacker to add their own second factor of auth, or for defense evasion bypassing MFA through the use of Temporary Access Passcode. The below query searches for such instances. It may not be suitable for a detection, but a worthy pivot during an investigation.

index=entra_audit activityDisplayName="User registered security info"
| eval Actor = mvindex('additionalDetails{}.value',0)
| rename activityDisplayName as Operation,
  initiatedBy.app.appId as SPN_Id
  targetResources{}.userPrincipalName as Target,
  targetResources{}.id as TargetId
| table _time Actor SPN_Id Operation  resultReason  Target  targetResources{}.modifiedProperties{}.displayName targetResources{}.modifiedProperties{}.newValue
There likely are other takeaways that can be gathered here, however, I think this is a good starting point. Feel free to reach out and comment other detection or hunting opportunities you derived from this scenario.
Conclusion
So what did we learn?
Just one mis-owned service principal with the right privileges is enough to blow a tenant wide open. Ofcourse, most corporate environments are not this lax, but security misconfigurations do happen. By owning the app, we were able to mint our own credentials, pivot into an app-only context, sidestep MFA entirely, and reset a Global Admin.
This really drives home the importance of identity governance and in large organizations where it's more challenging to prevent App registration and Service Principal Sprawl, good detections can definitely help the cause.
Hope you enjoyed this and stay tuned for scenario 2!
Oh and Don't forgot to run your clean up script!


Comments